
| 일 | 월 | 화 | 수 | 목 | 금 | 토 |
|---|---|---|---|---|---|---|
| 1 | 2 | 3 | 4 | 5 | 6 | 7 |
| 8 | 9 | 10 | 11 | 12 | 13 | 14 |
| 15 | 16 | 17 | 18 | 19 | 20 | 21 |
| 22 | 23 | 24 | 25 | 26 | 27 | 28 |
- map()
- spring boot
- 유레카
- 스프링 클라우드
- 도커
- JS
- 비동기
- SpringBoot
- 자바
- 스프링부트
- OAuth
- JavaScript
- Spring Cloud
- 코딩테스트
- date
- GIT
- Java
- docker
- jQuery
- gitlab
- STS
- map
- leetcode
- 프로그래머스
- spring security
- IntelliJ
- 스프링
- 자바스크립트
- Spring
- EUREKA
- Today
- Total
RATSENO
[SpringBoot]Spring Boot Security + OAuth 2.0 [Authorization code grant] (3) 본문
[SpringBoot]Spring Boot Security + OAuth 2.0 [Authorization code grant] (3)
RATSENO 2020. 9. 15. 13:25이전 포스팅
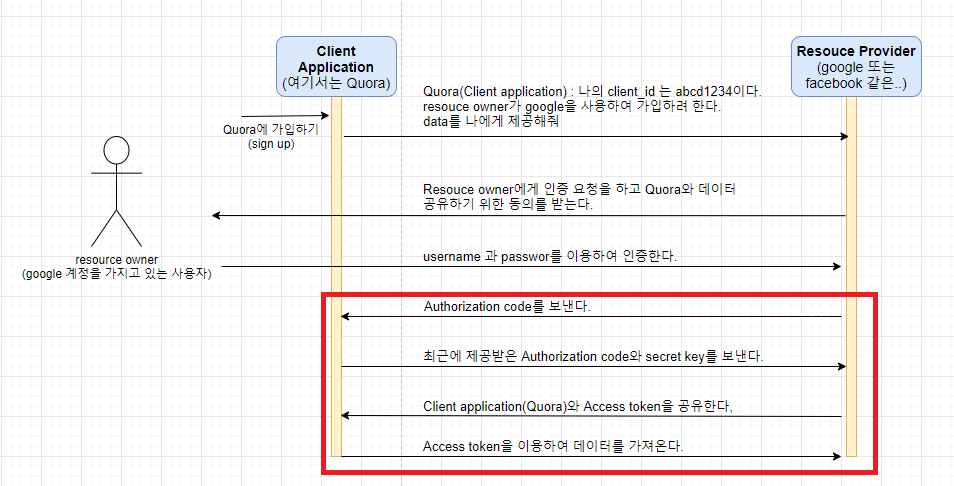
지난 포스팅까지 Authorization code까지 획득하였습니다.
이를 이용하여 Access Token을 얻고 JSON response를 받아보겠습니다.
이전까지의 내용을 간단히 정리하자면
- Resource Owner가 Client Application에게 Resource Server로 부터 데이터를 가져오도록 요청합니다.
- Reourrce Server는 Resource Owner에게 자기 자신을 증명하고 데이터를 공유할 수 있도록 권한을 요청합니다.
- 성공적인 인증 후, Resource Server는 Client Application과 Authorization Code를 공유합니다.
이번 포스팅은 아래와 같이 진행됩니다.
- Client Application은 Authorization Code와 Secret Key를 이용하여 Resource Server에게 Access Token을 요청합니다.
- Resource Server는 Client Application과 Access Token을 공유합니다.
- 공유된 Access Token을 이용하여 Client Application은 Resource Server에서 필요한 JSON 데이터를 가져올 수 있습니다.
Access Token 획득
Resource Server에서 Access Token을 획득하기 위해서는 Client Application에서의 수정이 필요합니다.
지난 포스팅에서는 Resource Server에서 Authorization Code를 획득하는 부분까지 진행하였습니다.
이 Authorization Code를 이용하여 Access Token을 획득할 수 있습니다.

위의 이미지에서 알수있듯이 Authorization Code는 request parameter로 수신됩니다.
Resource Server는 인증 시 request parameter로 보내주었던 redirect_uri를 이용하여 Client Application에 접근하여 합니다.따라서 redirect_uri, request parameter(Authorization Code) 를 받을 수 있는 Controller를 생성합니다.이를 이용하여 획득한 Authorization Code를 이용하여 Access Token을 얻어오겠습니다.
boot-client-application 프로젝트에 해당 Controller를 작성합니다.(EmployeeController 수정)
package com.ratseno.controller;

import com.fasterxml.jackson.core.JsonProcessingException;
import com.fasterxml.jackson.databind.JsonNode;
import com.fasterxml.jackson.databind.ObjectMapper;
import org.apache.tomcat.util.codec.binary.Base64;
import org.slf4j.Logger;
import org.slf4j.LoggerFactory;
import org.springframework.http.*;
import org.springframework.stereotype.Controller;
import org.springframework.web.bind.annotation.RequestMapping;
import org.springframework.web.bind.annotation.RequestMethod;
import org.springframework.web.bind.annotation.RequestParam;
import org.springframework.web.bind.annotation.RestController;
import org.springframework.web.client.RestTemplate;
import org.springframework.web.servlet.ModelAndView;
import com.ratseno.model.Employee;

import java.io.IOException;
import java.util.Arrays;

@Controller
public class EmployeeController {

    private final static Logger LOGGER = LoggerFactory.getLogger(EmployeeController.class);

    @RequestMapping(value = "/getEmployees", method = RequestMethod.GET)
    public ModelAndView getEmployeeInfo(){
        return new ModelAndView("getEmployees");
    }

    @RequestMapping(value = "/showEmployees", method = RequestMethod.GET)
    public ModelAndView showEmployees(@RequestParam("code") String code)throws JsonProcessingException, IOException {
        ResponseEntity<String> response = null;
        LOGGER.info("Authorization Code======>{}", code);

        RestTemplate restTemplate = new RestTemplate();

        String credentials = "ratseno:secret";
        String encodedCredentials = new String(Base64.encodeBase64(credentials.getBytes()));

        HttpHeaders headers = new HttpHeaders();
        headers.setAccept(Arrays.asList(MediaType.APPLICATION_JSON));
        headers.add("Authorization", "Basic " + encodedCredentials);

        HttpEntity<String> request = new HttpEntity<String>(headers);

        String access_token_url = "http://localhost:8080/oauth/token";
        access_token_url += "?code=" + code;
        access_token_url += "&grant_type=authorization_code";
        access_token_url += "&redirect_uri=http://localhost:8090/showEmployees";

        response = restTemplate.exchange(access_token_url, HttpMethod.POST, request, String.class);

        LOGGER.info("Access Token Response======>{}", response.getBody());

        return null
    }
}
작성 후, 이전 포스팅과 동일하게 진행을 하게 되면 Authorization Code를 받을 수 있는 Controller를 생성하였기 때문에
이를 이용하여 Access Token까지 정상적으로 획득하게 됩니다.

Access Token을 이용하여 JSON 데이터 가져오기
Resource Server 부분 수정
Resource Server에 설정관련 Class 파일을 추가합니다.
이 설정파일은 유효한 Access Token과 유효한 Scope를 가진 요청을 허용하여, 요청된 Resource를 가져옵니다.
Secure Resource에 대한 Access Rule을 작성합니다.
package com.ratseno.config;

import org.springframework.context.annotation.Configuration;
import org.springframework.security.config.annotation.web.builders.HttpSecurity;
import org.springframework.security.oauth2.config.annotation.web.configuration.EnableResourceServer;
import org.springframework.security.oauth2.config.annotation.web.configuration.ResourceServerConfigurerAdapter;

@Configuration
@EnableResourceServer
public class ResourceServerConfig extends ResourceServerConfigurerAdapter {
    @Override
    public void configure(HttpSecurity http) throws Exception {
        http.requestMatchers().antMatchers("/user/getEmployeeList/**").and().authorizeRequests().anyRequest()
                .access("#oauth2.hasScope('read')");
    }
}
Client Application 쪽으로 넘어옵니다.
Resource Server에서 받아서 사용할 Employee 모델을 생성합니다.
package com.ratseno.model;

public class Employee {
    private String empId;
    private String empName;

    public String getEmpId() {
        return empId;
    }

    public void setEmpId(String empId) {
        this.empId = empId;
    }

    public String getEmpName() {
        return empName;
    }

    public void setEmpName(String empName) {
        this.empName = empName;
    }

    @Override
    public String toString() {
        return "Employee{" +
                "empId='" + empId + '\'' +
                ", empName='" + empName + '\'' +
                '}';
    }
}
Access Token을 유효성 체크를 위해 사용하는 Client Application에서 URL을 호출하여 JSON 데이터를 가져옵니다.
package com.ratseno.controller;
import com.fasterxml.jackson.core.JsonProcessingException;
import com.fasterxml.jackson.databind.JsonNode;
import com.fasterxml.jackson.databind.ObjectMapper;
import org.apache.tomcat.util.codec.binary.Base64;
import org.slf4j.Logger;
import org.slf4j.LoggerFactory;
import org.springframework.http.*;
import org.springframework.stereotype.Controller;
import org.springframework.web.bind.annotation.RequestMapping;
import org.springframework.web.bind.annotation.RequestMethod;
import org.springframework.web.bind.annotation.RequestParam;
import org.springframework.web.bind.annotation.RestController;
import org.springframework.web.client.RestTemplate;
import org.springframework.web.servlet.ModelAndView;
import com.ratseno.model.Employee;
import java.io.IOException;
import java.util.Arrays;
@Controller
public class EmployeeController {
private final static Logger LOGGER = LoggerFactory.getLogger(EmployeeController.class);
@RequestMapping(value = "/getEmployees", method = RequestMethod.GET)
public ModelAndView getEmployeeInfo(){
return new ModelAndView("getEmployees");
}
@RequestMapping(value = "/showEmployees", method = RequestMethod.GET)
public ModelAndView showEmployees(@RequestParam("code") String code)throws JsonProcessingException, IOException {
ResponseEntity<String> response = null;
LOGGER.info("Authorization Code======>{}", code);
RestTemplate restTemplate = new RestTemplate();
String credentials = "ratseno:secret";
String encodedCredentials = new String(Base64.encodeBase64(credentials.getBytes()));
HttpHeaders headers = new HttpHeaders();
headers.setAccept(Arrays.asList(MediaType.APPLICATION_JSON));
headers.add("Authorization", "Basic " + encodedCredentials);
HttpEntity<String> request = new HttpEntity<String>(headers);
String access_token_url = "http://localhost:8080/oauth/token";
access_token_url += "?code=" + code;
access_token_url += "&grant_type=authorization_code";
access_token_url += "&redirect_uri=http://localhost:8090/showEmployees";
response = restTemplate.exchange(access_token_url, HttpMethod.POST, request, String.class);
LOGGER.info("Access Token Response======>{}", response.getBody());
// Get the Access Token From the recieved JSON response
ObjectMapper mapper = new ObjectMapper();
JsonNode node = mapper.readTree(response.getBody());
String token = node.path("access_token").asText();
String url = "http://localhost:8080/user/getEmployeeList";
// Use the access token for authentication
HttpHeaders headers1 = new HttpHeaders();
headers1.add("Authorization", "Bearer " + token);
HttpEntity<String> entity = new HttpEntity<>(headers1);
ResponseEntity<Employee[]> employees = restTemplate.exchange(url, HttpMethod.GET, entity, Employee[].class);
System.out.println(employees);
Employee[] employeeArray = employees.getBody();
ModelAndView model = new ModelAndView("showEmployees");
model.addObject("employees", Arrays.asList(employeeArray));
return model;
}
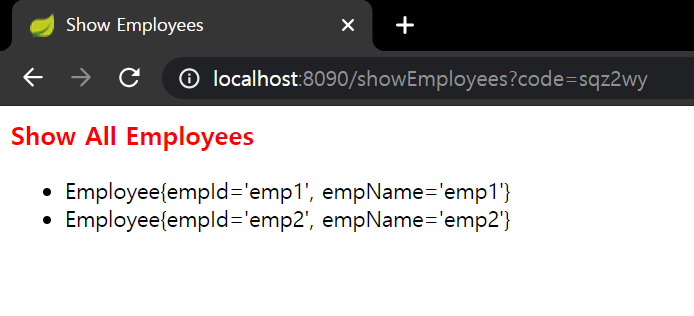
}다음으로 가져온 JSON데이터를 노출시킬 JSP페이지를 생성합니다.

<%@ taglib uri="http://java.sun.com/jsp/jstl/core" prefix="c"%>
<%@page session="false"%>
<html>
<head>
<title>Show Employees</title>
</head>
<body>

	<h3 style="color: red;">Show All Employees</h3>
	<ul>
		<c:forEach var="employee" items="${employees}">
			<li>${employee}</li>
		</c:forEach>
	</ul>
</body>
</html>
이제 boot-client-application, boot-resource-server 모듈을 동작시키고, 쭈욱 진행해 봅시다.


Resource Server에서 획득한 Authorization Code를 획득,
Client Application에서 Authorization Code와 Secret Key를 이용하여 Access Token 획득,
Client Application에서 획득한 Access Token을 이용하여 Resource Server로 부터 JSON데이터를 가져와 노출까지 성공하였습니다.
출처 : www.javainuse.com/spring/spring-boot-oauth-access-token
'DEV > SPRING' 카테고리의 다른 글
| Spring Securtiy 정적 자원 접근 허용 (0) | 2022.05.17 |
|---|---|
| [1]Spring boot + Spring Security + JWT + MySQL(docker) (0) | 2021.05.09 |
| [SpringBoot]Spring Boot Security + OAuth 2.0 [Authorization code grant] (2) (0) | 2020.09.14 |
| [SpringBoot]Spring Boot Security + OAuth 2.0 [Authorization code grant] (1) (0) | 2020.09.14 |
| [SpringBoot]SpringBoot 2.2.x 버전 Junit5에서 Junit4로 변경 (3) | 2020.02.26 |


