
| 일 | 월 | 화 | 수 | 목 | 금 | 토 |
|---|---|---|---|---|---|---|
| 1 | 2 | 3 | 4 | |||
| 5 | 6 | 7 | 8 | 9 | 10 | 11 |
| 12 | 13 | 14 | 15 | 16 | 17 | 18 |
| 19 | 20 | 21 | 22 | 23 | 24 | 25 |
| 26 | 27 | 28 | 29 | 30 |
- GIT
- map()
- Spring Cloud
- OAuth
- leetcode
- docker
- SpringBoot
- 유레카
- spring security
- 프로그래머스
- 도커
- date
- JavaScript
- 자바스크립트
- Java
- 스프링부트
- STS
- EUREKA
- 자바
- 비동기
- map
- IntelliJ
- Spring
- JS
- 스프링 클라우드
- jQuery
- spring boot
- 코딩테스트
- 스프링
- gitlab
- Today
- Total
RATSENO
[Spring]Spring Cloud Netflix - Eureka[1] 본문
Spring Cloud Netfilx 프로젝트는 Spring Boot를 통하여 Neflix OSS를 사용할 수 있는 프로젝트입니다.
이 프로젝트를 통하여 MSA 환경에 적합한 환경을 구축할 수 있습니다.
https://cloud.spring.io/spring-cloud-netflix/reference/html/#eurekas-health-checks
해당 프로젝트를 구성하는 4가지의 큰 Component들이 있습니다.
Netflix Component NameFunctionality
| Eureka | Service Registration and Discovery |
| Ribbon | Dynamic Routing and Load Balancer |
| Hystrix | Circuit Breaker |
| Zuul | Edge Server |
이 중에서 Eureka에 대한 포스팅을 써보려고 합니다.
MSA란 즉 MicroServiceArchitecture로 간단하게 말해서 하나의 큰 애플리케이션을 여러 개의 작은 애플리케이션으로 쪼개어 변경과 조합이 가능하도록 만든 아키텍처입니다.
이러한 작은 단위의 애플리케이션이 개발, 배포, 수정이 이루어지게 되면 적은 수의 애플리케이션의 경우 관리할 수 있겠지만, 그 수가 증가하게 될 경우 관리 포인트가 늘어나기 때문에 감당할 수 없을 정도로 힘들어집니다.
이러한 점들을 좀 더 편하게 관리하기 위해서 사용되는 것들은 여러 가지 있겠지만, 지금은 Spring Cloud Nefilx 프로젝트에서 제공하는 Euereka에 대해서 알아보려고 합니다.
Neflix Eureka의 목적
-
Eureka는 증설되어있는 마이크로 서비스들의 정보를 레지스트리에 등록하여 관리할 수 있도록 하며, 서비스 이용자의 수의 증가로 인한 마이크로 서비스 인스턴스의 추가적인 증설과, 삭제 등을 동적으로 탐색하며, Ribbon이라는 추가적인 로드밸런싱 기능까지 사용할 수 있습니다.
-
로드밸런싱과 장애 복구(failover)가 가능한 Middle-tier 서비스 환경을 구성했을 때 클라이언트(API Gateway 또는 다른 서비스)에게 가용한 서비스 인스턴스들의 위치 정보를 동적으로 제공할 수 있습니다.
-
기존 전통적인 로드 밸런서는 서버의 고정적인 IP 주소와 Host name을 기준으로 동작하는 반면, AWS와 같은 클라우드 환경에서는 서버 위치가 동적으로 변할 수 있기 때문에 로드 밸런서에 그 위치를 등록하고 변경하는 과정이 훨씬 더 까다로웠습니다.
-
또한 자주 사용되는 클라우드인 AWS는 middle-tier load balancer를 제공하지 않았습니다.
Eureka의 구성요소
-
Eureka Client : 서비스들의 위치 정보를 알아내기 위해 Eureka에 질의하는 서비스를 가리킴 (like Service consumer)
-
Eureka Service : Eureka Client에 의해 발견의 대상이 되도록 Eureka에 등록을 요청한 서비스를 가리킴 (like Service provider)
-
Eureka Server : Eureka Service가 자기 자신을 등록(Service Registration)하는 서버이자 Eureka Client가 가용한 서비스 목록(Service Registry)을 요청하는 서버
-
Eureka Instance : Eureka에 등록되어 목록에서 조회 가능한 Eureka Service를 의미
Eureka Server에 대해 좀 더 살펴보자면
-
Server는 모든 micro service가 자신의 가용성을 등록하는 레지스트리
-
등록 정보는 service id와 url을 포함
-
micro service가 시작되면 Eureka 서버에 접근해서 서비스 ID와 URL 등의 정보를 등록하고 자신을 알림(30초 heart-beat ping)
Eureka Client에 대해서도 같이 살펴보면
-
Server로부터 레지스트리 정보를 읽어와 로컬에 캐시
-
30초마다 갱신
-
레지스트리 정보의 차이를 가져오는 방식으로 갱신(delta updates)
로 정리할 수 있습니다.
간단한 예제를 통해서 Eureka 맛보기에 들어가 보겠습니다.
Eureka 간단한 실습
실습은 두 개의 모듈(프로젝트)로 구성됩니다. 하나는 서비스를 제공하는 모듈, 하나는 서비스를 소비하는 모듈 두 가지입니다.
간단한 서비스를 제공하는 모듈을 employee-producer, 서비스를 소비하는 모듈을 employee-consumer로 정하겠습니다.
-
서비스 제공 모듈 : employee-producer
-
서비스 소비 모듈 : employee-consumer

툴은 intellij를 사용하였으며, 모듈은 메이븐 프로젝트로 진행하겠습니다.
먼저 employ-producer 모듈을 생성해 보겠습니다.

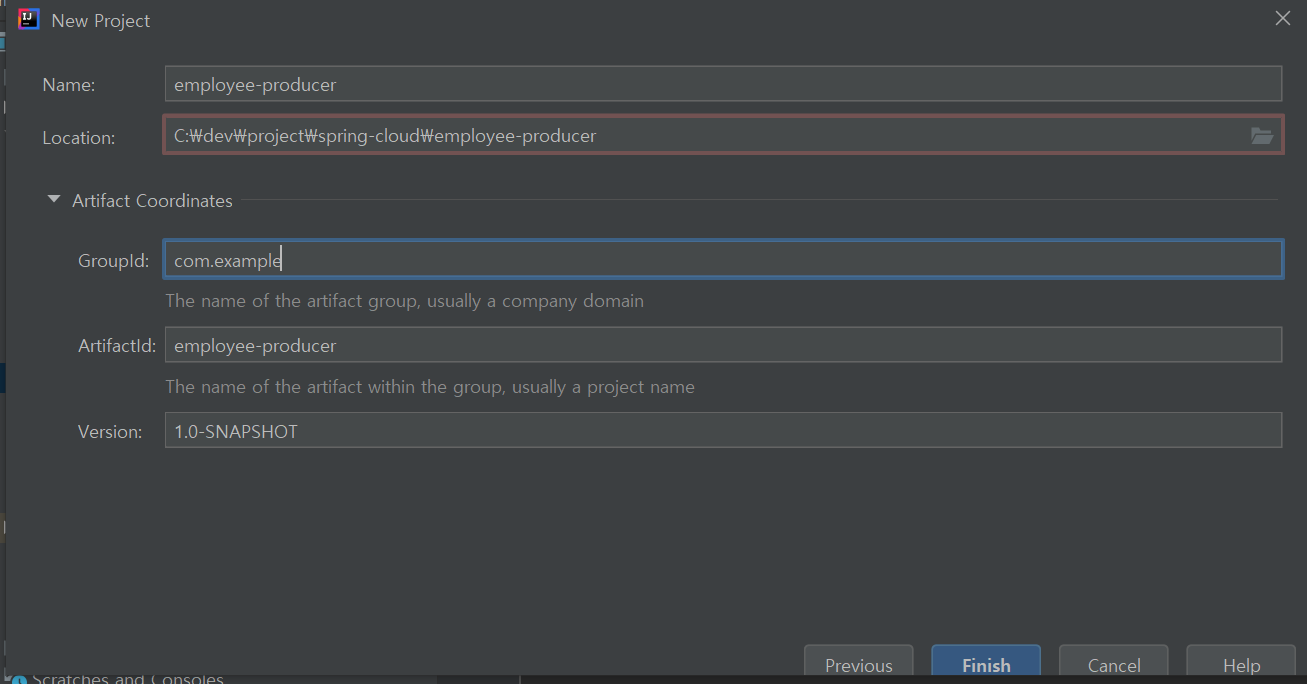
위와 같이 메이븐 프로젝트 생성 후 pom.xml에 필요한 dependency를 추가합니다.
<?xml version="1.0" encoding="UTF-8"?>
<project xmlns="http://maven.apache.org/POM/4.0.0"
         xmlns:xsi="http://www.w3.org/2001/XMLSchema-instance"
         xsi:schemaLocation="http://maven.apache.org/POM/4.0.0 http://maven.apache.org/xsd/maven-4.0.0.xsd">
    <modelVersion>4.0.0</modelVersion>

    <groupId>org.example</groupId>
    <artifactId>employee-producer</artifactId>
    <version>1.0-SNAPSHOT</version>
    <packaging>jar</packaging>

    <parent>
        <groupId>org.springframework.boot</groupId>
        <artifactId>spring-boot-starter-parent</artifactId>
        <version>1.4.1.RELEASE</version>
        <relativePath /> <!-- lookup parent from repository -->
    </parent>

    <properties>
        <project.build.sourceEncoding>UTF-8</project.build.sourceEncoding>
        <project.reporting.outputEncoding>UTF-8</project.reporting.outputEncoding>
        <java.version>1.8</java.version>
    </properties>

    <dependencies>
        <dependency>
            <groupId>org.springframework.boot</groupId>
            <artifactId>spring-boot-starter-web</artifactId>
        </dependency>

        <dependency>
            <groupId>org.springframework.boot</groupId>
            <artifactId>spring-boot-starter-test</artifactId>
            <scope>test</scope>
        </dependency>
    </dependencies>

    <build>
        <plugins>
            <plugin>
                <groupId>org.springframework.boot</groupId>
                <artifactId>spring-boot-maven-plugin</artifactId>
            </plugin>
        </plugins>
    </build>

</project>
현재는 Spring Boot를 사용하기 위한 기본적인 dependency만 추가가 되었으며 추후에 Eureka를 사용하기 위한 dependency도 추가될 것입니다. (처음부터 Spring Boot 프로젝트로 생성하셔도 무방합니다.!)
이제 domain class인 Employee class를 생성하고
package com.example.model;

public class Employee {
    private String empId;
    private String name;
    private String description;
    private double salary;

    public String getEmpId() {
        return empId;
    }

    public void setEmpId(String empId) {
        this.empId = empId;
    }

    public String getName() {
        return name;
    }

    public void setName(String name) {
        this.name = name;
    }

    public String getDescription() {
        return description;
    }

    public void setDescription(String description) {
        this.description = description;
    }

    public double getSalary() {
        return salary;
    }

    public void setSalary(double salary) {
        this.salary = salary;
    }
}
서비스를 노출하기 위한 Controller를 생성합니다.
package com.example.controller;

import com.example.model.Employee;
import org.springframework.web.bind.annotation.RequestMapping;
import org.springframework.web.bind.annotation.RequestMethod;
import org.springframework.web.bind.annotation.RestController;

@RestController
public class TestController {

    @RequestMapping(value = "/employee", method = RequestMethod.GET)
    public Employee firstPage(){
        Employee employee = new Employee();
        employee.setName("emp1");
        employee.setDescription("manager");
        employee.setEmpId("1");
        employee.setSalary(3000);
        return employee;
    }
}
Spring Boot 프로젝트 바로 생성하신 분들은 패스하셔도 되지만, 저와 같이 maven 프로젝트로 생성해서 Spring Boot 관련 dependency를 추가하여
Spring Boot 프로젝트를 사용하시는 분들은 main class가 자동생성되어있지 않기 때문에 main class를 생성해 주셔야 합니다.
package com.example;

import org.springframework.boot.autoconfigure.SpringBootApplication;
import org.springframework.boot.SpringApplication;

@SpringBootApplication
public class SpringBootHelloWorldApplication {
    public static void main(String[] args) {
        SpringApplication.run(SpringBootHelloWorldApplication.class, args);
    }
}
이제 module을 run 하고 localhost:8080/employee를 호출하게 되면

위와 같이 응답 값을 받을 수 있습니다.
employee-producer 모듈과 동일하게 employee-concumer 모듈도 생성해 보겠습니다.
<?xml version="1.0" encoding="UTF-8"?>
<project xmlns="http://maven.apache.org/POM/4.0.0"
         xmlns:xsi="http://www.w3.org/2001/XMLSchema-instance"
         xsi:schemaLocation="http://maven.apache.org/POM/4.0.0 http://maven.apache.org/xsd/maven-4.0.0.xsd">
    <modelVersion>4.0.0</modelVersion>

    <groupId>org.example</groupId>
    <artifactId>employee-consumer</artifactId>
    <version>1.0-SNAPSHOT</version>
    <packaging>jar</packaging>

    <parent>
        <groupId>org.springframework.boot</groupId>
        <artifactId>spring-boot-starter-parent</artifactId>
        <version>1.4.1.RELEASE</version>
        <relativePath /> <!-- lookup parent from repository -->
    </parent>

    <properties>
        <project.build.sourceEncoding>UTF-8</project.build.sourceEncoding>
        <project.reporting.outputEncoding>UTF-8</project.reporting.outputEncoding>
        <java.version>1.8</java.version>
    </properties>

    <dependencies>
        <dependency>
            <groupId>org.springframework.boot</groupId>
            <artifactId>spring-boot-starter-web</artifactId>
        </dependency>

        <dependency>
            <groupId>org.springframework.boot</groupId>
            <artifactId>spring-boot-starter-test</artifactId>
            <scope>test</scope>
        </dependency>
    </dependencies>

</project>
Employee-producer모듈에서 노출한 서비스를 사용하기 위해서 RestTemplate을 사용하여 Class를 생성합니다.
package com.example.controller;

import java.io.IOException;

import org.springframework.http.HttpEntity;
import org.springframework.http.HttpHeaders;
import org.springframework.http.HttpMethod;
import org.springframework.http.MediaType;
import org.springframework.http.ResponseEntity;
import org.springframework.stereotype.Controller;
import org.springframework.web.client.RestClientException;
import org.springframework.web.client.RestTemplate;
@Controller
public class ConsumerControllerClient {

    public void getEmployee() throws RestClientException, IOException {

        String baseUrl = "http://localhost:8080/employee";
        RestTemplate restTemplate = new RestTemplate();
        ResponseEntity<String> response=null;
        try{
            response=restTemplate.exchange(baseUrl,
                    HttpMethod.GET, getHeaders(),String.class);
        }catch (Exception ex)
        {
            System.out.println(ex);
        }
        System.out.println(response.getBody());
    }

    private static HttpEntity<?> getHeaders() throws IOException {
        HttpHeaders headers = new HttpHeaders();
        headers.set("Accept", MediaType.APPLICATION_JSON_VALUE);
        return new HttpEntity<>(headers);
    }
}
만들어진 Controller를 호출하기 위해 Bean으로 등록하고 로드한 뒤 호출하도록 작성하겠습니다.
package com.example;

import com.example.controller.ConsumerControllerClient;
import org.springframework.boot.SpringApplication;
import org.springframework.boot.autoconfigure.SpringBootApplication;
import org.springframework.context.ApplicationContext;
import org.springframework.context.annotation.Bean;
import org.springframework.web.client.RestClientException;

import java.io.IOException;

@SpringBootApplication
public class SpringBootHelloWorldApplication {

    public static void main(String[] args) throws RestClientException, IOException {
        ApplicationContext ctx = SpringApplication.run(
                SpringBootHelloWorldApplication.class, args);

        ConsumerControllerClient consumerControllerClient=ctx.getBean(ConsumerControllerClient.class);
        System.out.println(consumerControllerClient);
        consumerControllerClient.getEmployee();
    }

    @Bean
    public  ConsumerControllerClient  consumerControllerClient()
    {
        return  new ConsumerControllerClient();
    }
}
resources폴더 아래 application.properties 파일에
server.port=8091
로 설정한 뒤, employee-producer, employee-consumer를 run 하고 log를 확인하게 되면
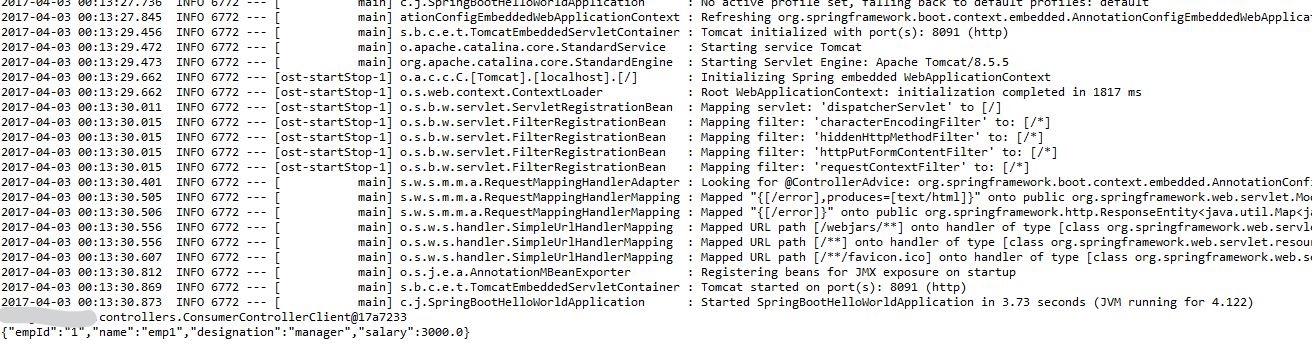
employee-consumer모듈이 employee-producer 모듈에서 노출한 서비스를 호출한 것을 확인할 수 있습니다.
다음 포스팅에서는 실제 euereka를 사용해 보도록 하겠습니다.
Github : https://github.com/RATSENO/spring-cloud-example/blob/master/README.md
'DEV > SPRING' 카테고리의 다른 글
| [Spring]Spring Cloud Netflix - Eureka + Zuul (3) | 2020.01.30 |
|---|---|
| [Spring]Spring Cloud Netflix - Eureka + Ribbon (1) | 2020.01.29 |
| [Spring]Spring Cloud Netflix - Eureka[3] (1) | 2020.01.29 |
| [Spring]Spring Cloud Netflix - Eureka[2] (0) | 2020.01.29 |
| 기본 객체와 영역 (0) | 2018.02.07 |


